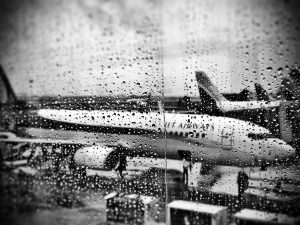
It has been pouring cats and dogs in Chennai for the past few days and what better time than now to take out your cameras and try getting some good pictures of the rain.
Here are a few tips for you guys based on my experience on the things that you need to follow to shoot a good rain picture.
- Always Protect Your Gear – Sudden drop in temperature/humidity might cause condensation to kick in and fog up your lenses. Though a bit of condensation won’t do any harm to your camera or lens, it always poses the threat of you not being able to take a picture when needed.All you need to do is carry your gear in a well padded camera bag (with a rain cover of-course) with all the zippers tightly shut and voila! You have an insulated, condensation free environment that would acclimatise your gear keeping it ready to shoot whenever necessary.
- Carry A Small Umbrella – If you really want to get down and dirty in shooting a picture during the rain, then it is always best to carry a small umbrella with you wherever you go. The umbrella always helps your camera to stay dry from all the wetness.
Note – This does not apply for thunderstorms as your umbrellas are pretty similar to lightning rods in construction and we wouldn’t want shooting pictures within the striking distance of lightning do we?
- Your Tripod Is Your Best Friend – Though it is not mandatory, carrying your tripod with you while shooting pictures in the rain is not a bad idea! Placing your camera/lens on the tripod would help you to get better focus and shoot in higher shutter speeds to nail that perfect shot as compared to shooting hand-held. This is advisable because the dim lighting conditions will limit your usage to slower shutter speeds which would result in blurred images.
Now that we have the basics out of our way, let’s get into some technical details shall we 🙂
- ISO – It is key not to go too overboard with the ISO as we all know that higher the ISO then higher the amount of image noise. I personally like to play around an ISO value of 1600 and not go beyond while shooting in the rain and 1600 is a good enough value to freeze those tiny droplets of rain. And combining it with the right shutter speeds will have u do wonders. However you can always experiment with different settings to get the desired mood or effect that you envision.
- Aperture and Shutter Speed – It makes sense to start with an aperture of f/8 or higher because when you are shooting rain, you are not just capturing one object, but everything right from the background to the falling rain drops are in focus. You can start shooting with a shutter speed of 1/250 sec and decide to go higher or lower depending on what you wish to shoot. If you wish to shoot in higher shutter speeds, then your aperture needs to change accordingly as well, which would help you shoot those perfect pictures even in dim lighting conditions and vice-versa.
- Get A Little Flashy – I personally like to get a little creative with the flash and try lighting up a few of the dimmer elements in my photographs. However you can you a use your flash to pump out a very low output say may be at -3.0 stops to just give that right amount of light on to the frame to light up the rain drops. It’s a bit tricky to get the perfect flash photograph in the rains, but hey what’s fun in shooting when there’s no experimentation right 😉
Well that’s about the things that I have to share and the rest is upto your imagination and creativity.
I hope these tips prove useful to you guys.
Have fun shooting.
Karthik